| GOODYEAR RACER "LI'L QUICKIE" |
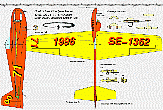
| GOODYEAR RACER "LI'L QUICKIE" |
Wing
Balsa 7 mm quarter grain, density 80-100 grams per cu.dm. (26-33 oz per
sq.ft.) Note that the joints allow the lead out channels to be cut and
bellcrank with leadouts inserted before joining. Leading edge abachi.
Trailing edge very hard balsa. Outer tip .5 mm steel cut into center of wing
with hard balsa strips on top and bottom. Lead weight added for a total
of 15 grams. Try to render the wing section accurately. Thickness tapers
from 7 mm at centre to 4.5 mm at tips. Section symmetrical.
Make tip skids from PET soda bottle material, cyanoed in place after
finishing is complete, replace as they wear out.
Tailplane Balsa 5 mm medium, quarter grain, leading edge abachi. Elevator cut out after glassing.
Fuselage Balsa 10 mm, 100 grams per cu.dm. Side doublers .4 mm plywood, shape shown. Engine bearers 10x10 mm beech. Note the taper. Adjust spacing to engine used. Save weight by drilling 6 mm holes vertically into the bearers (not through) from the tank lug position and rearwards, spaced 9-12 mm. An engine heavier than USE (135 grams) will require a shorter nose. (10 mm allowance by the 1/8-10% rule) Top & bottom reinforcements abachi. These are important as they prevent cracks from starting here. Fin 5 mm light balsa. Nose cheek light balsa. Insert pushrod slot and cutoff wire tube before joining the side doublers. Bearer plates 3 mm dural, held by six countersunk wood screws. Nose & tail skids 1.25 mm piano wire stitched to 1 mm plywood pieces. Note wing and tailplane incidence angles when cutting their slots. A temporary plywood cutout is needed to be able to connect the pushrod. Use polyurethane wood glue (expanding) to set wing and tailplane in fuselage.
Bearer, Tank and Valve detail
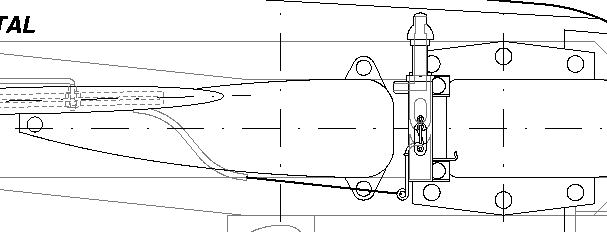
Tank The tank works by the uniflow
principle. By having the filler tube inside the tank end at the outboard
wall and the overflow closed, the fuel supply becomes independent of fuel
level.
Materials: Epoxy-fibreglass (works for diesel fuel only). Capacity 20-25
cc. Bulb built on balsa form with a thick layer of wax as release agent.
(Normal release agents are not enough.) Lay patches of thin glass cloth
to a thickness of 4-6 layers. After curing use heat for removal and clean
off the wax very carefully. Make bottom and walls at wing cutout from .4
mm printed circuit board material. Reinforce all wall joints with an
extra layer of glass. Mounting lugs reinforced with .3 mm brass brackets,
covered with glass. Right wall should be outboard of carburetor jet, 15%
of forward distance. (Example: if the Carburetor jet is 60 mm forward of
the tank feed point, the tank outer wall, where the feed point is
located, should be 7.5 mm outboard of the carburetor jet.) Tube
connecting ends are recessed into front of tank facing the valve for
maximum forward location of the tank. Recesses made from 5 mm Al tube.
Feed tube 2 mm, ends in lower rightmost point. Filler tube 3 mm ends in
vertical symmetry line rightmost point. Overflow tube ends in highest
point when in refueling position (upper leftmost).
The tank can also be made by balsa, hollowed out and carefully sealed
with epoxy and covered with fibreglass.
Where rules don't allow tank valves (such as in Denmark), the overflow tube has to be open in flight. In this case the potential problem of fuel siphoning out of the tube that gets the least pressure is overcome by having both filler and overflow tubes going through the fuselage, facing leftwards (inboard). The overflow in this case should have its tank end in the upper rightmost point. Fix the overflow and filler tubes to the fuselage and connect to the tank by neoprene hose. In any case the filler must not be placed on the tank, since the construction won't support the forces of refueling. Finished weight 7 grams. Attach by small sheet metal screws. Rear screw needs a dowel plug inserted into the fuselage. (Front screws go into the bearers.)
Valve
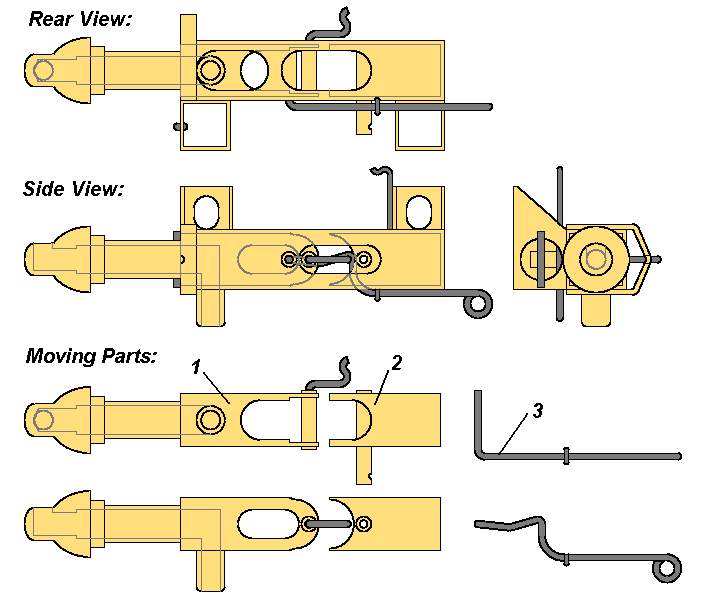
This is just a tube pincher valve. It operates by filling
the tank, so no extra handling is needed to reset the cut-off. The feed
line is closed when filling, which eliminates the risk of flooding the
engine.
Two tubes go though it: The feed tube and the overflow tube. The latter
is pinched closed except when filling. The filler is always open and used
for venting the tank. There are a number of pieces that move inside the
outer square tube. Three springs that load the moving parts are not shown
in the figure, just their attachment hooks.
The Moving Parts

Landing gear
Box middle piece: 3mm plywood saturated with cyano after jigsawing to
shape. Sides: epoxy pc board .8 mm. After glueing in place drill around
25 small holes along the cavity contour, stitch together with kevlar
thread and soak with cyano. Also stitch the whole box to the beech
bearer. The cavity is to hold a cushion of 3 mm soft polyurethane, cut
and drilled to adjust spring action. Leg: 3 mm dural, is ground to
streamlined section. Leg pivot: 4 mm brass tube, length 3.05 mm squeezed
between the box walls and held by M 3 screw and nut. Wheel: Hub is from
steel, threaded M6x.75, drilled 4 mm, length 5 mm. Flanges: Dural sheet
1.5 mm, threaded on hub. Tyre: 2 mm hard polyurethane. Secure with cyano.
Pivot: Steel 3.95 mm with flange, M3 threaded hole, held to leg by M3
countersunk screw. Secure with epoxy.
Covering After sectioning of wing, tailplane and fin the balsa is saturated with cyano right behind the wing right leading edge abachi strip, the tips and trailing edges. Apply a thin dope coating (50% thinner added) before covering with epoxy & glass cloth, 23 g per sq.meter. Wing right leading edge double layers. Fuselage front & fuselage to wing and tailplane joints triple layers. "Wing pressing" technique is preferred for wing and tailplane.
Control mechanism Bellcrank .8 mm steel with 4 mm brass tube pivot & 2 mm brass tube pushrod sleeve, soldered. Shaft 3 mm steel, attached to two .4 mm pc board reinforcements into wing. Pushrod 1.25 mm piano wire, adjustment piece 2 mm brass tube. Elevator horn .8 mm pc board with 2 mm brass tube pushrod bearing. The horn low end follows the contour of the elevator section to cover the end and is secured by glass cloth wrap. Lead outs .6 mm 7 strand wires, bellcrank connection loops .75 mm piano wire, copper wire wound over the joints before soldering. Cut-off wire, .4 mm, connects between pushrod and valve lever hook through 1.6 mm Al tube cut into the fuselage under the plywood. Lead out guides 2 mm brass tube. Guides shown for 15.92 m .3 mm lines. British 'Open Goodyear' with .35 mm lines require the guides to be moved rearwards by 4 mm. Use handle with 47 mm line spacing. Remember that a hidden control mechanism can't be inspected for wear and weaknesses. Build it to never have to worry, using double safety wherever possible.
Finishing Polyurethane enamel preferred, but car enamel in spray can is convenient. Allow ample drying time before flying. Racing number "71" on fuselage twice and left wing tip. Canopy, ailerons & rudder markings and "Lil Quickie", "EXPERIMENTAL" & licence number text add to authenticity.
Remember that 40 grams can
be saved not by saving 40 grams someplace but 1 gram in 40
places! ![]()
The Achilles heel of Goodyear models is the fuselage between the wing and the tailplane. Often the fuselage gets snapped off here in a hard catch. There may be lighter constructions than the sandwich design used here with plywood - balsa - plywood, but I doubt anything can match the strength vs. lightness. It could be a good idea to add an extra strip of carbon or glass cloth on both sides.
Göran Olsson, 1996 - - - SWE-1362