| Bill Lee's Line Rake Test |
Bill Lee ![]() writes:
writes:
I used to have a very good model bought in 1990 from Shabasov/Ivanov. It was extremely fast but my pilot, John McCollum, had always complained about how critical it was on take-off, often getting to the end of the lines only after 1/4 lap of free-flight! It was an accident waiting to happen!
In more recent years, I have started a program of building my own models in an attempt to create something close to the quality and speed of the (former) Soviet models. And, of course, if it's being done on one of their's, it must be absolutely the best way to do it! :-) I copied the Shabasov model as closely as I could, even to the placement of the leadouts at the wingtip.
And McCollum told me in no uncertain terms that these models were, if anything, WORSE than the Shabasov model on take-off, and that I needed to move the leadouts back. After two of them, built in great haste, the third had the leadouts placed where the "numbers" suggest they should be, approximately .75"-.8" (about 2cm) behind the balance point at the inboard wingtip.
But John could not be soothed! He didn't trust the "numbers" and insisted that we do some empirical testing. Which we did and from which this one photograph resulted.
We carefully determined the CG of the model. On the inboard side of the cowl, we painted a right triangle in red with the vertical side of the triangle at the back and exactly on the CG. We glued a small black "winglet" on the inboard tip, also a right triangle but with the vertical edge at the front and also on the CG.
We built a mount for my Nikon camera which would allow it to sit on top of the speed pylon in the center of the circle. It was positioned so that John could walk around the pylon while flying the model and easily press the button on the camera to take a picture. We pre-focussed the camera on the model and set the shutter speed for 1/1000 second. We used a 300mm zoom lense, but I have no idea exactly where it was set.
We set up the model, got a decent setting and then proceeded to take pictures as John flew the model. The airspeed was approximately 18.0, and as luck would have it, this photo is the only one of a dozen or so where the model was actually in the picture!
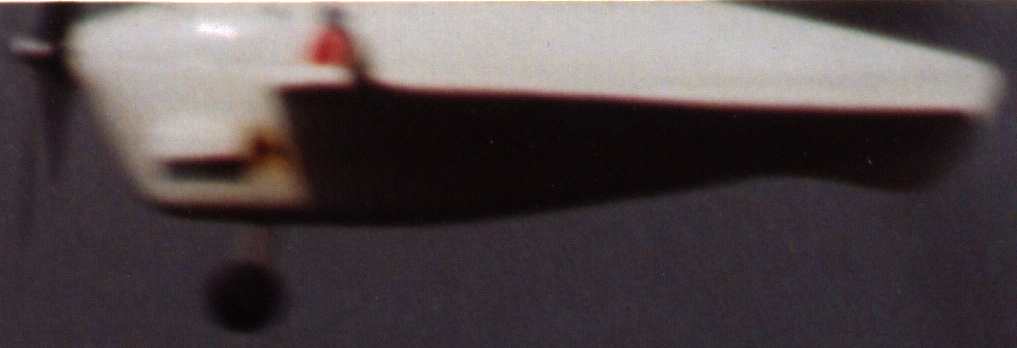
Just barely, as you can see the top is missing off the edge. But the all-important alignment triangles are quite clear. You can see from them that the two vertical edges are in very near alignment, proving to us (especially to John) that the "numbers" work! Finally got John to stop fussing at me about the line placement! And the ground handling of the models is VERY much better with no apparent penalty in the air. (No, I haven't done any testing to verify that! But this model was running very comfortably under 17.5 at the U.S. Team Trials, so I am fairly certain that this proper leadout placement has not hurt the speed to any significant degree.)
A word about "vertical". The shutter on a camera like mine works with two moving "shades". When you activate the shutter, the shades sweep across the film, and the delay between their activation is the control mechanism for the shutter speed. In this picture, vertical is swept forward a few degrees due to the sweep of the shutter across the film at the same time the camera is panning to follow the model. In the background (which is not visible in this picture) you can see vertical elements (e.g., telephone or light poles, buildings, etc) also leaning in the direction the camera was moving. Look at the trailing edge of the red triangle: that is vertical!